-
Log in to your Rackspace Email account by going to apps.rackspace.com.
-
Click the Support menu in the upper-right corner of the page, and then click Settings.
-
In the left pane, click Composing Email and then click the Signatures tab.
-
Click Add New Signature.
-
In the Add New Signature dialog box, enter a descriptive name for your signature. In the Edit Signature area, enter the text for your signature. You can use plain text, HTML, or rich text with the formatting options available in the editor (for example, bold, italics, and colored text).
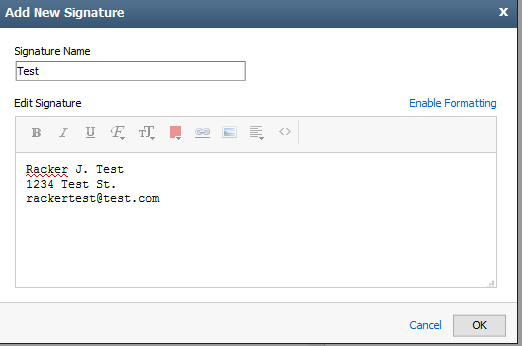
Note: If you switch to plain text, you lose any HTML formatting that you have applied.
-
Select OK to return to the Settings window.
-
Click the name of your signature file in the Current Signatures and then choose any of the additional options.
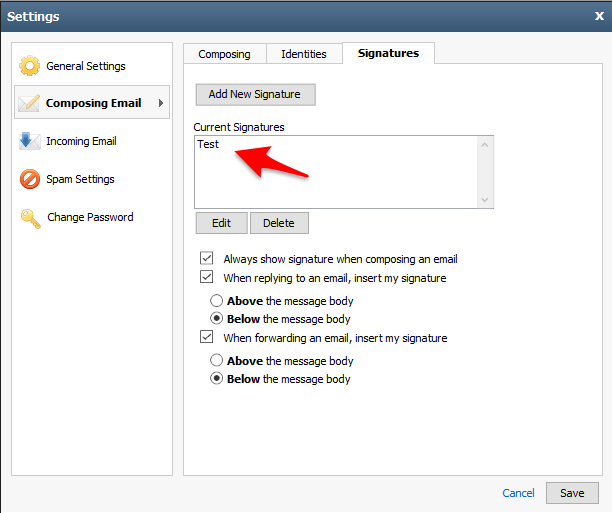
- To automatically insert the signature when composing a new email, select the Always show signature when composing an email check box.
- To automatically insert the signature when you are replying to an email, select the When replying to an email, insert my signature checkbox. Also, specify whether the signature should appear above or below the body of the message.
- To automatically insert the signature when you are forwarding an email, select the When forwarding an email, insert my signature checkbox. Also, specify whether the signature should appear above or below the body of the message.
-
Click Save.
-
Click the Identities tab, double-click your email address, and then enter the following information in the spaces provided.
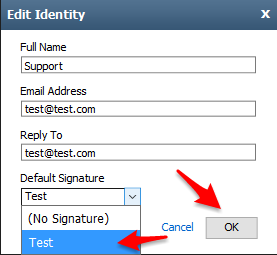
- Full Name: This name will appear in the From field of messages that you send.
- Email Address: Enter the email address that should be displayed as the From email address.
- Reply-To: Enter the email address that you want recipients to use when they reply to your email message. If you leave this field blank, the address you entered in the Email Address box is used automatically.
- Default Signature: Select a signature to use with this identity.
-
Click OK.
-
To change your default identity selection, click the identity as it appears in the Current Identities box, click the Set as Default button, and then click the Save button.
Note: When composing an email, you can change identities by clicking the From drop-down menu in Webmail, which appears at the top of the Compose Email window.